Showing posts with label Tips. Show all posts

Saturday 7 September 2013


Getting paid apps for free (ANDROID)


Enable Your Device To Install From Unknown Sources :-

allow installation from unknown sources Android
If you have not enabled installation of applications from unknown sources on your Android device before, then read on. Otherwise skip this..
Or else Just follow these steps below.
  1. Click the “Menu” button on your home screen.
  2. Go to “Settings”.
  3. Now go to “applications” tab.
  4. Now tick the “Unknown sources” option.
That’s it. Now you can install any application from outside the Google Market also.

How to Download Android Apps for Free :

  1. Download Blackmart Alpha Application
  2. Install it in your Android Phone.
  3. Open Google Play Store and search any paid application.
  4. Pick Name of any paid application which you want to download.
  5. Now Open Blackmart Alpha Application.
  6. Search the name of application (paid in google play store).
  7. After find any application (paid in google play store) and click to download.
  8. Install in your phone.
Done ! In this way you download paid android applications for free.

Don't forget to give your feedback in the comments. Thanks !

How to get paid apps for free on Android

Friday 9 August 2013

Authorizing new PC with iTunes


Learn how to authorize or deauthorize your computer with your Apple ID.

Authorizing and deauthorizing a computer allows you to manage which computers can sync or use apps, audiobooks, books, music, movies, or other content you've purchased from the iTunes Store.
You can use or sync your purchases from the iTunes Store on up to five different computers (these can be any mix of Macintosh or Windows-compatible computers). When you sync or play an item you've purchased, your computer is "authorized" for purchase using your Apple ID.
Notes:

Additional Information

  • iTunes DRM-protected music includes audio with a bit rate of 128 kbps and allows users to transfer songs and videos to up to five computers, burn seven copies of the same playlist to CD, and sync to an unlimited number of iPods.
  • iTunes Plus music refers to songs and music videos available in 256 kbps AAC encoding (twice the current bit rate of 128 kbps), and without digital rights management (DRM). There are no burn limits and iTunes Plus music will play on all iPods, Mac or Windows computers, Apple TVs, and many other digital music players.
  • You may need to enter your Apple ID information again after initializing or formatting your hard disk. Initializing or formatting the hard disk does not remove the computer from the list of authorized computers. If you plan to initialize or format your hard disk prior to selling or donating your computer, deauthorize the computer first, then initialize or format the hard disk.
  • Under some circumstances you may be required to enter your Apple ID information again, but this should not use up multiple authorizations. If you think that you may have used up multiple authorizations on just one computer, see One computer using multiple iTunes Store authorizations.
  • The iTunes Store is governed by its Terms of Service, which permits Apple to change the authorization policy.
  • An Apple ID based on an expired MobileMe account can still be used to purchase items and to authorize or deauthorize computers to play purchased music.

How to authorize new PC with iTunes

Tuesday 6 August 2013


10 Simple Tips To Increase Facebook Fans!!

  1. Create your Facebook fan page with a catchy image because a good image always helps you to get more likes from people. You can also use your company logo there instead of an image.
  2. Send a request to your friends which are in your profile to like your fan page.
  3. Keep your fan page always up to date because it always gives your readers to read some fresh contents.
  4. Promote your Facebook fan page on your official website or blog because it helps you to get likes from your new visitors on your site.
  5. Create a Custom URL for your fan page & it always helps your visitors to find your fan page easily.
  6. Interact with your fans by replying to their comments on your posts.
  7. Promote your fan page within your friend circle and if you are a SMO (Social Media Optimizer) then it always helps you to get more likes from your friends.
  8. Whenever you run any type of contest on your blog or website ask your visitors to like your fan page.
  9. If you are running a serious business then you should promote your fan page by using ads in the Facebook.
  10. Synchronize your fan page with your other profiles on social networks like Twitter, Digg, Stumble.
Don't Forget to give your feedback. Thanks !

How to increase likes on Facebook Page

Monday 5 August 2013

How to play a windows xp game on windows 7

Sunday 4 August 2013


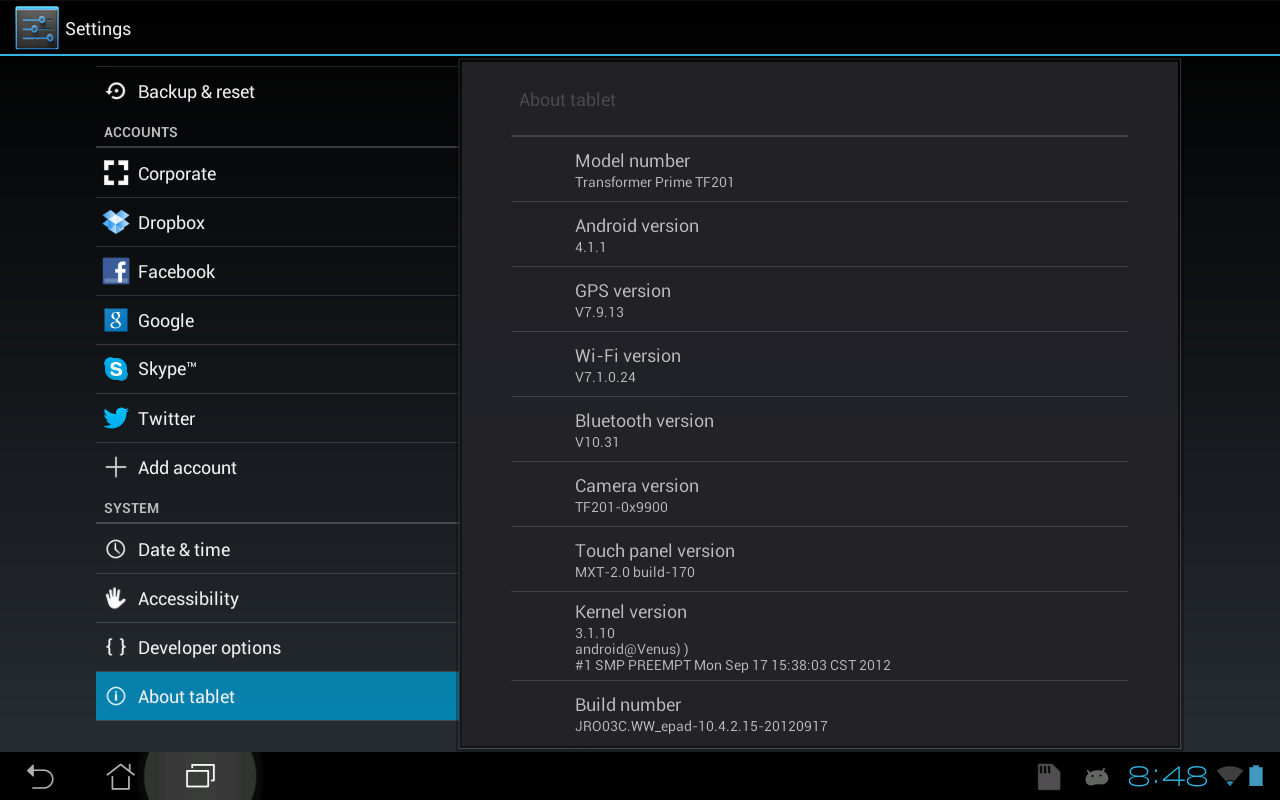
Rooting Transformer Prime after Jelly Beans Update


If you had root on the ASUS Transformer Prime before updating to Jellybean 4.1.1 you will realise that you end up with a partial root after upgrading. However the good news is that you can restore full root access on your ASUS Transformer Prime quite easily.
Note: i did have a root backup created by OTA Root Keeper, however trying to restore that after upgrading was not successful. I’m not sure if trying to do that played a part in the partial root i had after upgrading or not.
First on your Transformer Prime load the settings app, go to Development options and enable USB debugging, then connect your Transformer Prime to the PC with the USB cable. If you are asked to install drivers download the drivers here.

The easy way to re-root your Transformer Prime on Android Jellybean 4.1.1

Since writing this tutorial many months ago, a newer, easier and automated root method has been discovered for the Asus Transformer Prime on Jellybean 4.1.1 and various other devices. You do not have to have an existing partial root now either, you can root a completely stock Transformer Prime.
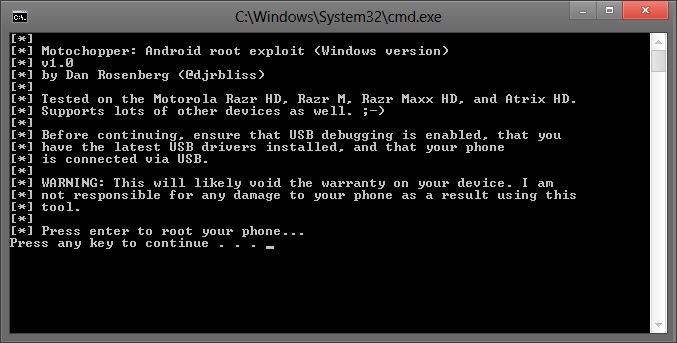
To root your Transformer Prime, simply download Motochopper, then open the run.bat if you are on Windows. You will be informed that you need the usb drivers installed, and that you must have USB debugging enabled as i mentioned above.
asus transformer prime root Root Transformer Prime After Jellybean 4.1.1 Update
Once you have done this press any key to continue and you should have a fully rooted transformer prime in around a minutes time.

The older way to re-root your Transformer Prime on Jellybean 4.1.1

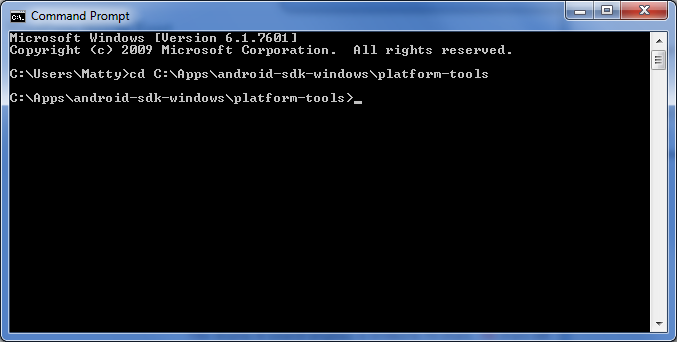
To do this you will need the Android SDK installed, after installing you will need to open a command prompt window and navigate to the platform tools folder.
As i installed the Android SDK to C:\Apps for me this would be
cd C:\Apps\android-sdk-windows\platform-tools
root transformer prime 1 Root Transformer Prime After Jellybean 4.1.1 Update
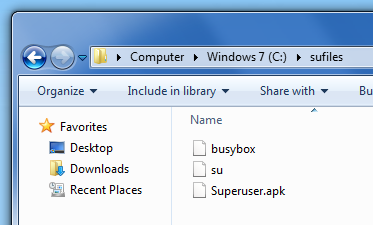
Now download sufiles.zip and unzip them to your C:\ drive in a folder called “sufules”
root transformer prime 2 Root Transformer Prime After Jellybean 4.1.1 Update
Run the following commands in the command prompt window to push the superuser files to your Transformer Prime
adb push C:\sufiles\su /data/local/tmp/
adb push C:\sufiles\Superuser.apk /data/local/tmp/
adb push C:\sufiles\busybox /data/local/tmp/
Now type:
adb shell
You should now be in a shell / terminal prompt on your device, type in the following commands
chmod 6755 /data/local/tmp/su
chmod 755 /data/local/tmp/busybox
chmod 644 /data/local/tmp/Superuser.apk
sysrw
cp /data/local/tmp/su /system/bin
cp /data/local/tmp/busybox /system/bin
cp /data/local/tmp/su /system/xbin
cp /data/local/tmp/busybox /system/xbin
cp /data/local/tmp/Superuser.apk /system/app/
reboot
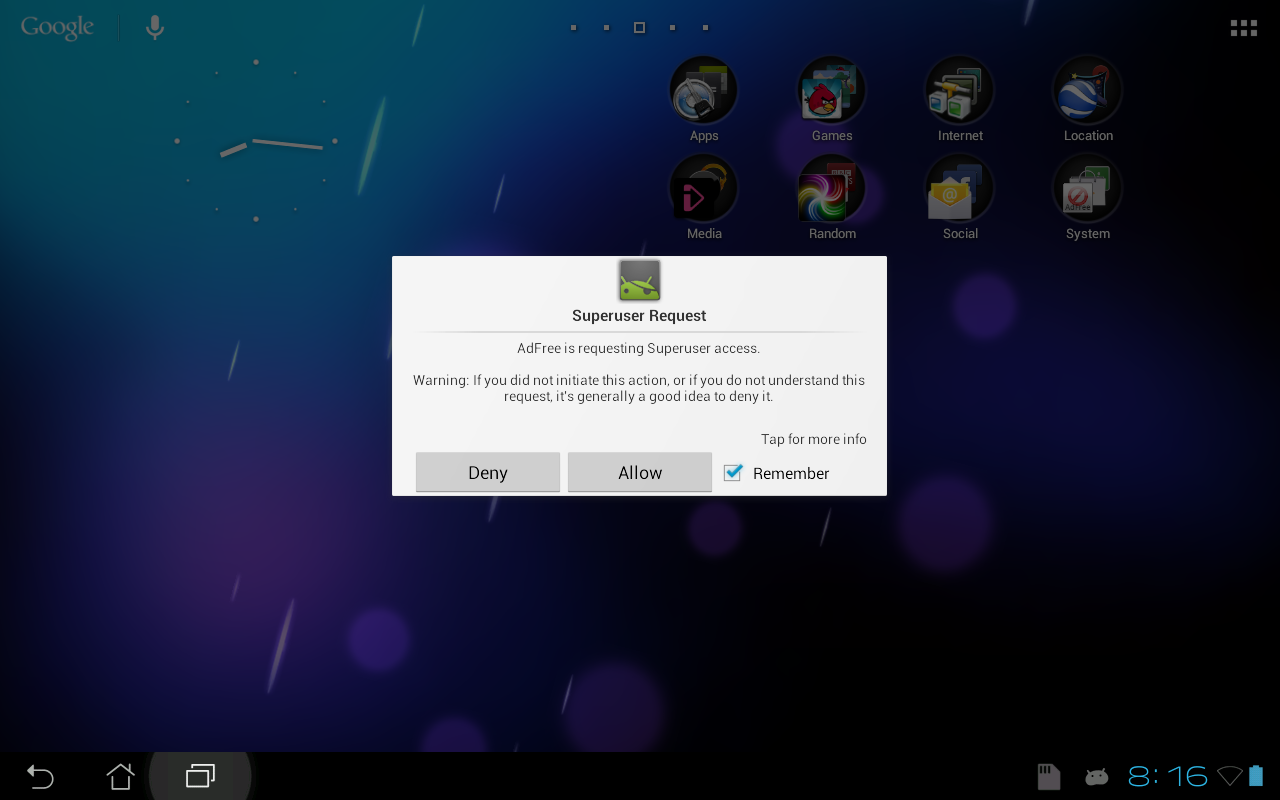
After your Transformer Prime re starts you should find you can grant applications root / super user access when the app request it.
root transformer prime 3 Root Transformer Prime After Jellybean 4.1.1 Update
Asus Transformer Prime after the Jellybean 4.1.1 update:
root transformer prime 5 Root Transformer Prime After Jellybean 4.1.1 Update
Hopefully this will allow newbies and experienced users alike to re gain root on the Transformer Prime After Jellybean 4.1.1 Update, i was able to do so perfectly anyway.

How to root Transformer Prime after update


Moving all apps to SD card without ROOT


A nice feature that most Android devices offer is a microSD (or SD) slot, and nicer still is the fact that the Android OS allows you to move most apps over to external storage to help free up space on the main device. For those with 16GB+ phones or tablets, this benefit might not be evident, but for those with older devices, it’s a life-saver.
The phone I’m using is HTC’s Legend, which in its default configuration leaves a mere 160MB free to the user for apps and other things. That’s no joke. While I am still pondering upgrading to a newer phone, this one continues to serve me well, but with a storage limitation like that, I have made it a point to move over all apps to a microSD card to avoid space issues. It’s not hard to burn through a 160MB, let me tell you.
If you’re an Android user who has moved apps over to the external storage, you’re likely aware that there are limitations. Some software is considered to be integral and can’t be moved, and then there is other software like Facebook or Google Maps which you might not even use that can’t be moved without rooting the device.
Complicating things even further, when developers publish their apps, they can design them in such a way that they can’t be moved over to an SD card. This is what some would call a dumb move, but the reason it’s done is because phone storage is going to be faster than external storage more often than not. Even still though, having a choice would be nice.
Android - Moving Apps from Phone to microSD
For those games and other tools that don’t inherently allow you to move them to an SD card, there are solutions – and they don’t require rooting. Instead, you’ll need to download the Android development kit, change the default install destination on your phone, move your apps over, and then revert back to stock. If it sounds complicated, it isn’t.
There are a couple of things to bare in mind before diving into this though, and those are important. While using this technique will allow you to move over widgets and OS tools, don’t do it. After a phone boots, the SD card is not immediately mounted, and as such, if your widgets or other important software is there, you’re not going to have access right away. Further, even after the storage is mounted, you might run into an issue where widgets are bugged because of the configuration. So I can’t stress this enough:

Apps Not to be Moved to SD Card
  • Widgets – no matter how menial in usefulness or design.
  • System tools – many might not operate as intended without being on the phone’s storage.
  • Important apps – you don’t want to risk an important app becoming inaccessible when you need it.
I should also mention that as I have no experience up to this point with Android 4.0 (Ice Cream Sandwich), I am not certain that these methods would work. However, Android by design hasn’t changed much with regards to system tools, so chances are they would.

Step 1: Install Android SDK

Installing software to perform a tweak like what we’re going to do isn’t ideal, but overall, this SDK is rather lightweight. You’ll have to go here to grab it, making sure to download the ‘installer_r16-windows.exe’ for the sake of ease. The .zip archive can be chosen instead if you’d prefer to not install anything. To run the SDK, Java is required, so that might also have to be downloaded.
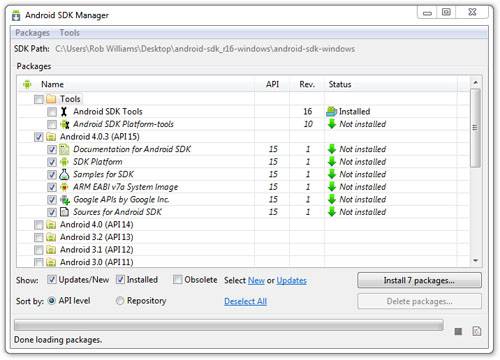
With the SDK installed or extracted to the desktop, and Java installed, you can run the ‘SDK Manager’ to see the application:
Android - Moving Apps from Phone to microSD
Because the tool we need isn’t included with the SDK by default, you need to click the ‘Android SDK Platform-tools’ option and then click ‘Install Packages’. This will take a few minutes to complete, but once done, we can get to tweaking.

Step 2: Setting Up Your Phone

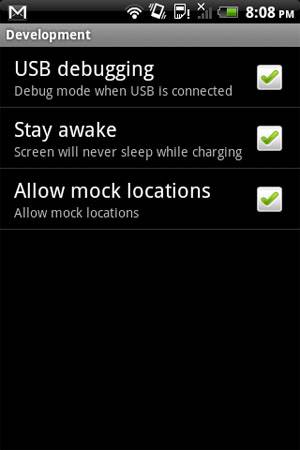
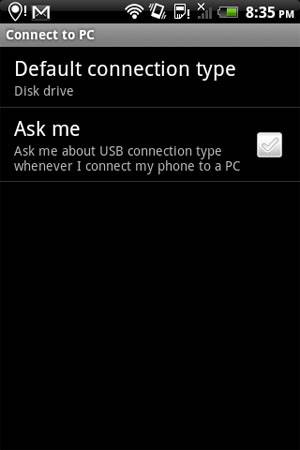
I’m not 100% certain on which options need to be enabled in order for this to work, but there’s no harm in touching all the bases and making sure it will “just work”. ‘USB debugging’ assuredly needs to be enabled, as does ‘Allow mock locations’. For the connection type, I use ‘Disk drive’ which has never caused me an issue.
Android - Moving Apps from Phone to microSD Android - Moving Apps from Phone to microSD
If you don’t like leaving these settings checked, you are able to revert them back after you copy over what you need to the microSD card. I personally leave them enabled all the time as I’ve yet to find an issue with it.

Step 3: Running the Tweak

With the software above installed and the phone prepped, you’re able to load up a command prompt in Windows and go to the install folder in order to run the tool we need. By default, the install folder will be found under the Program Files (x86) folder. The full path for me was:
C:\Program Files (x86)\Android\android-sdk\platform-tools\
Note: If this folder doesn’t exist, look here instead: 
C:\Users\(Your Username)\AppData\Local\Android\android-sdk\platform-tools\
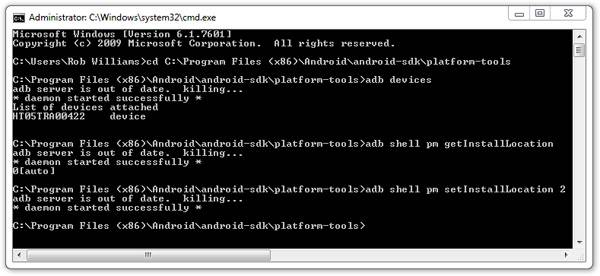
You can navigate here with the ‘cd’ tool. Prefacing the path above with ‘cd ‘ (note the space, no quotes in actual command) will bring you straight there, as you can see in the shot below.
Android - Moving Apps from Phone to microSD
If your phone is not being picked up, you might need to install some drivers. For any Android phone you have, starting here would be a good idea.
Here are the commands that need to be run:
adb devices
Probes Android devices connected to the PC. Do this first to assure that the phone is being detected.
adb shell pm getInstallLocationAlternate (ICS+): adb shell pm get-install-location
This results in a numerical value to state where the default install location is (0: phone, 2: external).
adb shell pm setInstallLocation 2Alternate (ICS+): adb shell pm set-install-location 2
This sets the default install location to the external storage.
Note: Thanks to commenter Ajith R Nair for pointing out the alternate commands. 
Once the last command is set, you can run the ‘getInstallLocation’ command again to verify that it went into effect, and then you can unplug your phone and get on with moving some apps.

Step 4: Moving Your Apps to an SD Card

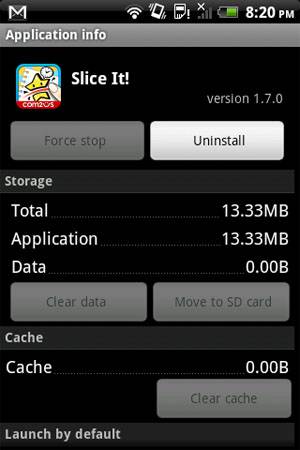
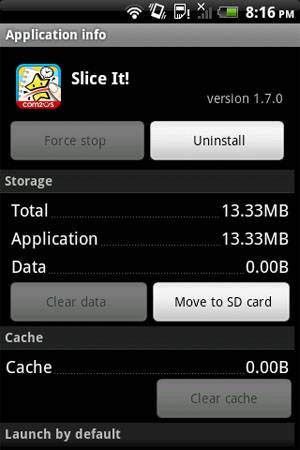
Below is an example of a game where the developer disabled the ability to move the game to an SD card, before and after. As you can see, while the option to move to an SD card was faded out without this tweak, it was lit up afterwards. Don’t mind the odd clock changes here, as I did a lot of this in the reverse order.
Android - Moving Apps from Phone to microSD Android - Moving Apps from Phone to microSD
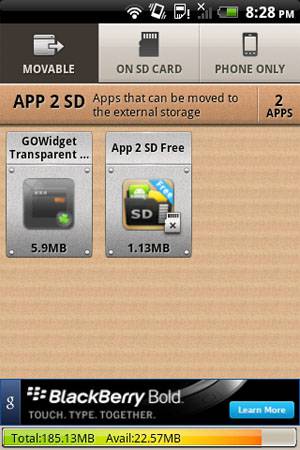
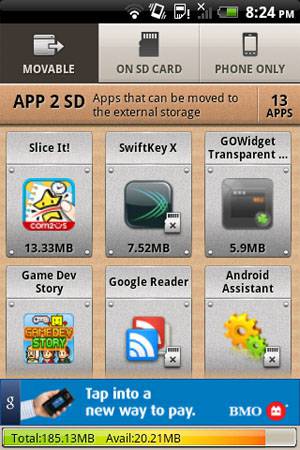
Figuring out which apps can be moved and which can’t is easily the most tedious part of using Android, but fortunately apps exist to make the chore a lot easier to stomach. One solution I’ve been using is called “App 2 SD“, as it’s both free and intuitive (though not that pretty, in my opinion). Here’s another before and after example:
Android - Moving Apps from Phone to microSD Android - Moving Apps from Phone to microSD
As you can see, using this tweak suddenly allows me to move over many apps to my SD card, freeing up valuable space. As mentioned earlier, I emplore you to not copy over things like widgets as it will result in some headaches. Some system tools might be fine to be moved over, but I’d be careful there also.
Once you have moved over everything that you need to, I’d highly recommend reverting the tweak by connecting your phone and setting the default location back to 0. This will avoid any potential headaches, some of which I experienced over the past week of using this tweak. All-in-all though, this tweak is an easy way to free up some space on your phone, all for free and without rooting.

Discuss this article in our forums!

Have a comment you wish to make on this article? Recommendations? Criticism? Feel free to head over to our related thread and put your words to our virtual paper! There is no requirement to register in order to respond to these threads, but it sure doesn’t hurt!

How to move all apps to sd card without ROOT